

Render Carrier Boards or RCBs rely solely on a variety of screws to hold them in place. As such, the industry has extensive guidance on the fixing patterns required to ensure maximum security and stability. However, fixing patterns are not exclusive to render carrier boards as insulation boards also require fixings. Wet and dry-fixing are the methods we recommend at EWI Store to enhance security. Therefore, we recommend deploying both solutions to effectively secure the insulation boards. In today's blog, we will discuss fixings patterns for render carrier boards and insulation boards, as well as approved adhesive coverage patterns.
What is a render carrier board?
A render carrier board is a type of sheathing board. They are often installed on timber or steel frame constructions to provide a durable substrate. As their name suggests, RCBs are specifically designed to hold a layer of silicone or monocouche render. The premier range of render carrier boards is STS. The Construction Board from STS is a robust fibre cement board, strongly endorsed by multiple top-tier render manufacturers. The superior strength and high density yield an impact-resistant, stable, and weatherproof construction board, making it an ideal choice for external render carriers.
Its uncomplicated fibre cement makeup presents an ideal surface for receiving thin coat render systems such as those provided by the listed brands. The board comes with a Euro Class A1 Fire Rating (BS EN 12467), highlighting its safety features. In addition to its impact resistance, it possesses a high density, making it resistant to varying weather conditions and water. It's also perfectly suited for heavy-duty external applications.
One of its significant advantages is its ability to maintain minimal board movement. Moreover, the STS Construction Board is render-ready, making it a convenient option for construction needs.

Why are fixing patterns important?
There are several reasons why fixing patterns is integral to the overall assembly. The right fixing pattern ensures the board is securely attached to the underlying structure. This stability is crucial for both the safety and durability of the construction project.
An appropriate fixing pattern helps distribute the load evenly across the render carrier board. This distribution can prevent the concentration of stress in one area, which could otherwise lead to deformation or even failure of the board.
Render carrier boards, like most materials, expand and contract with temperature changes. A proper fixing pattern can accommodate this movement. This reduces the risk of warping, cracking, or other damage caused by thermal expansion or contraction.
A good fixing pattern can also prevent water infiltration by ensuring the boards are tightly joined. This protection is particularly important in exterior applications where the boards are exposed to the weather.
Lastly, a uniform fixing pattern can result in a neater, more professional finish, especially if the render carrier boards are a visible part of the final structure.
Recommendations for carrier board installation
STS provide several recommendations before the application of fixings. It is pertinent to heed these recommendations as the failure to do so may compromise the whole system.
"Do you recommend a vertical or horizontal batten framework? - The STS Construction Boards must have a cavity behind, vented at the top and bottom so we recommend fixing the boards to vertical battens. In some applications where you are trying to achieve a specific build-up or match an existing cladding detail, a cross batten can be used. This includes horizontal battens being fixed to the building substrate and then vertical battens fixed to the horizontal battens (ensure fixings between battens are suitable for the application and cladding/render weight)."
"Do I need a gap on the joints? - STS recommend a 3-5mm gap on all sides of the boards. Mostly render boards are either fixed to a timber batten, insulation, or a timber/steel frame building. Whilst timber is a cost-effective and fast-build option it is one of the most susceptible substrates to movement. Any amount of moisture or heat can cause the timber frame/substrate to twist or move. If the boards are butt-jointed without a gap and the timbers move it cause the boards to push/grind against one another and will either push one board up, down, out or in. By leaving a 3-5mm gap you are allowing for that slight movement and as the render systems incorporate a mesh layer little or no movement will be transferred through to the topcoat."
Source: STS Construction Board Product & Installation Guide
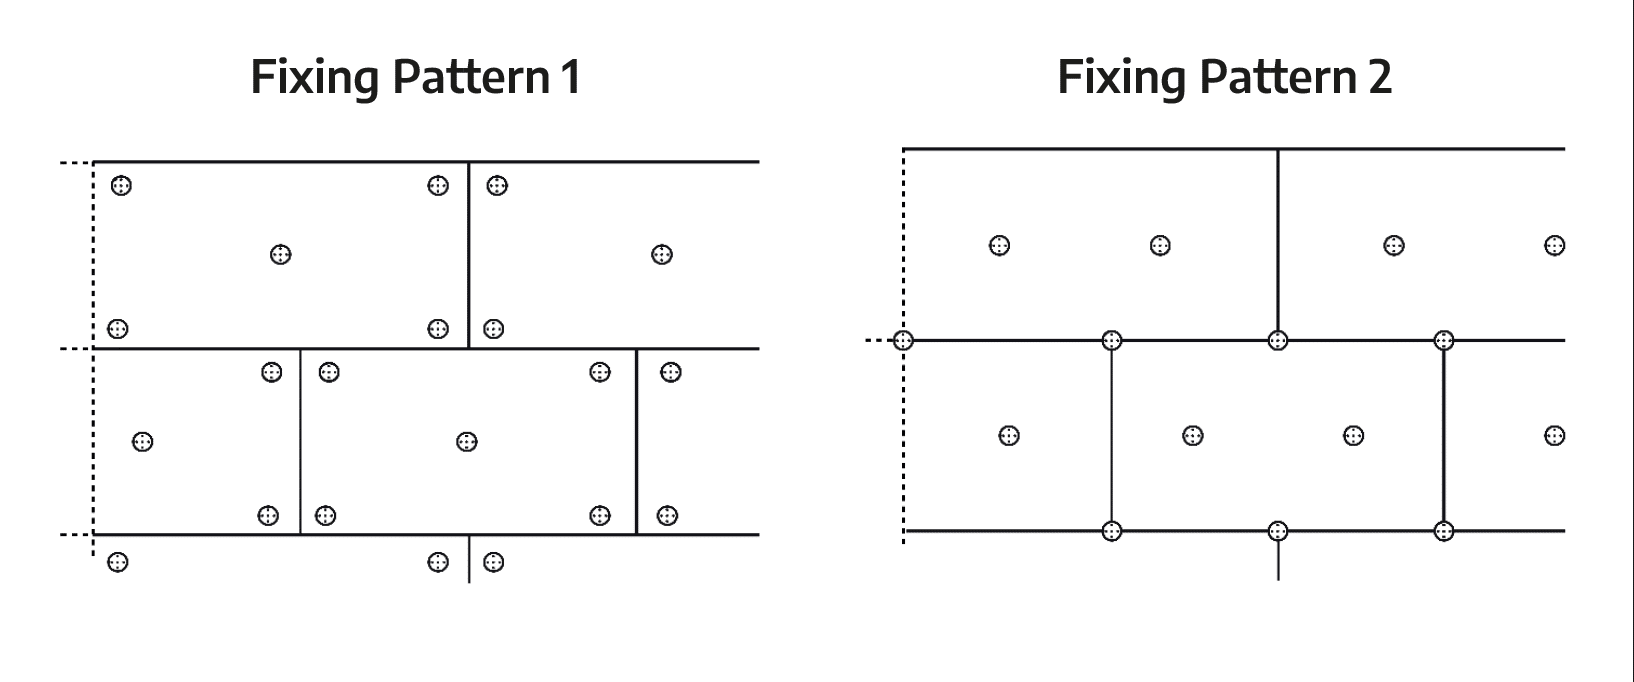
Fixing patterns for carrier boards
As discussed above, the number of fixings needs to be extensive to ensure dimensional stability. Dimensional stability in materials, including render carrier boards, refers to the degree to which a material maintains its original dimensions when subjected to various conditions such as changes in moisture, temperature, or pressure.
The fixing pattern is linear which promotes several benefits. A linear fixing pattern provides even support across the entire length of the board. This ensures that the board is secure and reduces the risk of warping or buckling. Linear patterns also help evenly distribute the load across the entire surface of the board. This is crucial for preventing concentrated areas of stress that could lead to structural failure.

As you can see in the diagram, the fixings are set out in 3 lines, numbering 27 or 25 in total, depending on the style and size of the board. The reason for allowing a 10-20mm buffer from the edge of the board is to ensure that the board does not split. The spacing also aids in accommodating any movement due to atmospheric or environmental factors. The nominal 2-5mm gap also factors into this.
Fixings for metal and wood
The fixings also vary between materials as timber and metal framing have different properties. Metal is a harder material than wood. Therefore, screws designed for metal often have sharper points and threads, enabling them to pierce and grip metal surfaces. In contrast, screws for wood don't need to be as sharp because wood is a softer material. The metal fixings have a distinctive wing that aids in the establishment of a grip on the material.
The threading for wood screws is generally finer (which means the threads are closer together), which helps them better grip the soft, fibrous nature of wood. Conversely, screws for metal applications typically have a coarser pitch (the threads are spaced further apart), which is more effective at cutting and gripping into the harder, more solid metal material.
Wet and dry-fix for insulation
Insulation boards are typically fixed with both adhesives and mechanical fixings to ensure maximum security, durability, and efficiency. Here are the main reasons why both are used:
- Adhesive benefits - Adhesives can provide a more even and consistent hold across the entire insulation board. This reduces the chance of gaps forming between the board and the wall, which can compromise the insulation's efficiency by allowing heat transfer.
- Structural strength - While adhesives provide a strong bond, mechanical fixings like screws or nails offer additional strength. These fixings are particularly important for securing the insulation boards in place, especially in larger, heavier boards, or in cases where the boards are installed on ceilings or vertical walls where gravity could pull them down.
- Wind load resistance - In external wall applications, wind can exert a significant load on the insulation. The combination of adhesives and mechanical fixings ensures a secure attachment that can resist this wind load. Therefore, the risk of damage or detachment over time is reduced.
- Longevity and durability - The combination of adhesives and mechanical fixings ensures the insulation board will remain securely attached over the long term, even as the building shifts and settles. This can prevent future maintenance or replacement costs associated with poorly attached insulation boards.
- Adaptable to substrate conditions - Certain substrates may not be suitable for adhesives alone, or mechanical fixings alone. By using both, it caters to a wider range of substrates and ensures a more secure attachment in varied conditions.
Adhesive and insulation fixing patterns
The combination of a wet and dry-fix solution enhances the security of the EWI system. We recommend two variations of both adhesive and mechanical fixing patterns.

Let us know your thoughts in the comments!